17 Sun and Moon Tattoo Matching Best Friends Ideas (With Placement, Pain, and Aftercare Advice)
Nervous about picking a matching tattoo design you and your best friend will actually still love in ten years? You’re not alone, and honestly, that’s the right instinct to have before you sit in a tattoo chair. This guide pulls from real studio conversations, actual technique names, and honest tradeoffs — not just pretty pictures with no follow-through.
So what are the best sun and moon tattoo matching best friends ideas? Fine-line crescent moons paired with simple sun outlines, dotwork mandala suns, and single-needle minimalist pairs work best. They stay legible at small sizes, heal cleanly, and the symbolism (one can’t exist without the other) fits a best-friend bond better than most matching designs out there.
Keep scrolling and you’ll get placement recommendations for every body type, a realistic pain breakdown by spot, ballpark pricing, and the exact way to brief your artist so the stencil actually matches what’s in your head.
Why Sun and Moon Tattoos Work So Well for Best Friends

The sun and moon idea works because it’s a complete pair — nobody wants “half a design” tattooed on their arm. One friend gets the sun, the other gets the moon, and together they represent balance: day and night, light and dark, two different personalities that still orbit each other. That built-in symbolism means you don’t need a long explanation every time someone asks about it. Visually, the two shapes also contrast well on skin. A sun’s radiating lines and a moon’s smooth curve create natural variety, so even if you get the same artist and same session, your two tattoos won’t look identical or boring.
Know Your Techniques Before You Book

Before you pick a design, it helps to know what you’re actually asking for. Tattoo studios use these terms constantly, and knowing them will make your consultation faster and your results more predictable.
- Fine line: Thin, single-pass linework done with a small needle grouping. Looks delicate and detailed but can fade or blur faster over 10+ years if lines are too thin or placed on high-movement skin.
- Blackwork: Solid, saturated black ink filled in heavily. Bold, high-contrast, and tends to hold its shape longer than fine line because there’s more ink density.
- Dotwork: Shading and texture built from tiny individual dots instead of solid fill or line shading. Creates a soft, gradient look — common in mandala-style sun designs.
- Single needle: A specific fine-line technique using one needle point, popular for tiny minimalist tattoos under an inch.
- Negative space: Using the untouched skin itself as part of the design (like a moon’s crescent shape formed by what’s not inked).
1. Fine-Line Sun and Moon Wrist Duo

This is the classic version most people picture first. One friend gets a small sun with thin, evenly spaced rays; the other gets a simple crescent moon, both done in fine line with no shading. The linework stays under 1mm thick, which keeps the design looking crisp rather than smudgy. Best placed on the inner or outer wrist at around 1 to 1.5 inches wide. Wrist skin is thin and close to bone, so expect a moderate pinch during the session — sharper than fleshier spots like the forearm. Healing typically runs 10 to 14 days. Bring a reference image with consistent line thickness so your artist doesn’t default to a heavier outline. This placement works well for a first tattoo since it’s visible but easy to cover with a sleeve for work.
2. Blackwork Crescent Moon and Sun Silhouette

If you want something bolder and more permanent-looking, blackwork is the move. Instead of thin outlines, the sun and moon shapes are filled solid with saturated black ink, giving a graphic, almost sticker-like silhouette. This holds up better over decades than fine line because dense ink doesn’t spread or fade as quickly. Good placement options are the upper arm, calf, or shoulder blade, sized around 2 to 3 inches. Solid fill sessions take a bit longer since the artist has to pack in color evenly, and healing can take up to 3 weeks with some peeling. Ask your artist about their fill technique and saturation consistency before booking — spotty blackwork is one of the most common touch-up requests. This style reads well from a distance, making it a strong statement piece rather than a subtle one.
3. Dotwork Sun and Moon Mandala Pair

Dotwork trades solid fill or clean lines for tiny stippled dots that build up shading and texture gradually. Applied to a sun design, it creates a soft mandala effect with radiating rays that fade from dense to light near the tips — genuinely striking work when done by someone experienced in the technique. The moon half can mirror this with dot-shaded craters or a soft gradient along the crescent’s edge. This style needs more surface area to read clearly, so aim for 2.5 to 4 inches, on the forearm, shoulder, or upper back. Dotwork sessions tend to run longer and can feel more repetitive on the skin than straight linework, so pain builds gradually rather than sharply. It’s a strong pick if you want something more artistic-looking than a basic outline, and it ages surprisingly well since the dot density hides minor fading.
4. Single-Line Minimalist Sun and Moon

This is the most stripped-down version: one continuous, unbroken line forms both the sun’s circle-with-rays and the moon’s crescent, with zero shading or fill. It’s the tattoo equivalent of a doodle, and that’s exactly the appeal — it looks intentional in its simplicity. Because there’s so little detail, size matters a lot here; go too small and the line quality suffers over time. Aim for at least 1.5 inches. Best placed on the ankle, collarbone, or side of the forearm where skin stays relatively flat. Pain is generally lower here since there’s no repeated shading pass, just one clean line. This design is ideal for a first-time tattoo or for someone who wants something workplace-appropriate and easy to explain in one sentence.
5. Negative Space Crescent Moon with Solid Sun

Here’s where negative space comes in — instead of inking the entire moon shape, the artist leaves a curved sliver of bare skin untouched, using surrounding black ink or shading to define the crescent by contrast. Paired with a solid, fully-inked sun on the friend’s matching piece, you get two totally different textures that still visually connect. This technique demands a skilled hand, since uneven spacing between the inked and bare areas can make the moon look unfinished rather than intentional. Best on lighter, evenly-toned skin where contrast reads clearly; size should stay around 2 inches minimum. Ask to see healed (not just fresh) examples of an artist’s negative space work in their portfolio before booking. This option suits people who already have some ink and want their next piece to feel more advanced and conceptual.
6. Celestial Sun and Moon with Star Cluster

Adding a small cluster of star accents around the sun and moon gives the matching set more visual movement without changing the core meaning. Typically done in fine line, with the stars kept smaller and lighter in weight than the main sun or moon shape so they don’t compete for attention. This works nicely scattered along the collarbone, down the spine, or trailing along the ribs. Rib placement is worth a pain warning — it’s consistently rated as one of the more uncomfortable spots due to thin skin over bone and the stretching sensation with breathing. Healing on ribs also takes longer, often 3 weeks, because clothing friction can irritate the area. Bring a rough sketch showing star placement so the artist can adjust the layout to your body’s natural lines rather than a flat reference photo.
7. Bold Traditional Sun and Moon

Old-school American traditional style means thick, confident outlines, a limited but saturated color palette (often reds, yellows, blacks), and a face or expressive design worked into the sun and sometimes the moon too. This is a completely different visual language from fine line — bolder, more colorful, and built to last. Traditional work tends to age the best of any style because thick lines and heavy saturation resist blurring over decades. Best placed on the upper arm, thigh, or shoulder where there’s enough flat space for the bold linework to sit properly. Pain is moderate to high depending on placement, mostly due to longer shading passes for color fill. If you want color, confirm with your artist which pigments they use and how they expect the saturation to hold up on your specific skin tone.
8. Single-Needle Tiny Sun and Moon Behind the Ear

For something genuinely discreet, single-needle work behind the ear keeps the entire design under an inch. The technique uses one fine needle point for extremely thin, precise lines — perfect for tiny symbols that need to stay legible without any shading. Because the skin behind the ear is thin and mobile, expect a sharper, more surprising pain sensation than fleshier spots, even though the tattoo itself is small. Healing usually takes about 10 days, and hair can occasionally get in the way during the process, so ask your artist how they’ll manage that. This spot is easy to hide for work but visible enough to show off with hair pulled back — a solid choice for a first matching tattoo with a friend who also wants to keep things low-key.
9. Sun and Moon Face Design (Sol y Luna Style)

This design gives the sun and moon actual facial features — eyes, a nose, sometimes a subtle expression — a style rooted in traditional “Sol y Luna” imagery. It’s more detailed than an abstract shape, so it needs more real estate to avoid looking cluttered: think 2.5 to 3.5 inches minimum. Shading is usually done with soft gradients rather than flat fill, giving the faces some dimension. Best placed on the shoulder, upper arm, or thigh. Because there’s more fine detail packed in, sessions run a bit longer, and touch-ups after the initial healing period are common to sharpen any lines that settled unevenly. This one works well as a custom design rather than a flash (pre-drawn, ready-to-use) piece, since your artist can adjust the expression to feel less generic.
10. Fine-Line Sun and Moon with Radiating Linework Rays

Instead of a solid or dotted sun, this version uses multiple thin, individually-drawn rays extending outward in a fine-line style, giving a more delicate, almost sketched look compared to a solid sun disc. The moon stays simple — usually just a clean crescent outline. This pairing photographs well and tends to look intentional rather than busy, since every ray is deliberate rather than filled space. Best on the forearm or side of the calf where there’s a long, narrow canvas for the rays to stretch across. Healing is standard for fine line, around 2 weeks, though thin rays can blur slightly faster than thicker lines if aftercare is inconsistent. Ask your artist to space rays unevenly rather than perfectly symmetrical — it reads as more hand-drawn and natural on skin.
11. Geometric Sun and Moon Outline

Geometric styling turns the sun into a series of straight, angular lines instead of round rays, and the moon into a faceted, crystal-like crescent. This is a good option if you want something that feels more modern and less “storybook” than a traditional sun and moon pair. Precision matters a lot here — even minor asymmetry in geometric linework is noticeable, so this style benefits from an artist who specifically works with geometric or linear designs in their portfolio. Best placed on the forearm, upper back, or ankle where the skin stays flat enough for straight lines to hold their shape. Pain is comparable to standard fine line. This design suits people who like the sun-and-moon meaning but want something that doesn’t look overtly celestial or “witchy” at first glance.
12. Sun and Moon Script Combo

Pairing the symbols with a small word, date, or each other’s initials adds a personal layer beyond the visual symbolism alone. Typically the script is kept in a thin serif or simple cursive font at a smaller scale than the sun or moon icon, so the symbol stays the visual focus. Best placement is the forearm, ribcage, or side of the hand where there’s a straight line for the text to follow. One real tradeoff: script ages less gracefully than simple shapes, since fine serifs can blur slightly after 10+ years, especially on higher-movement areas like the hand. If lettering matters a lot to you, ask your artist about slightly thicker line weight for the text specifically, even if the symbol stays fine line.
13. Matching Puzzle-Piece Sun and Moon
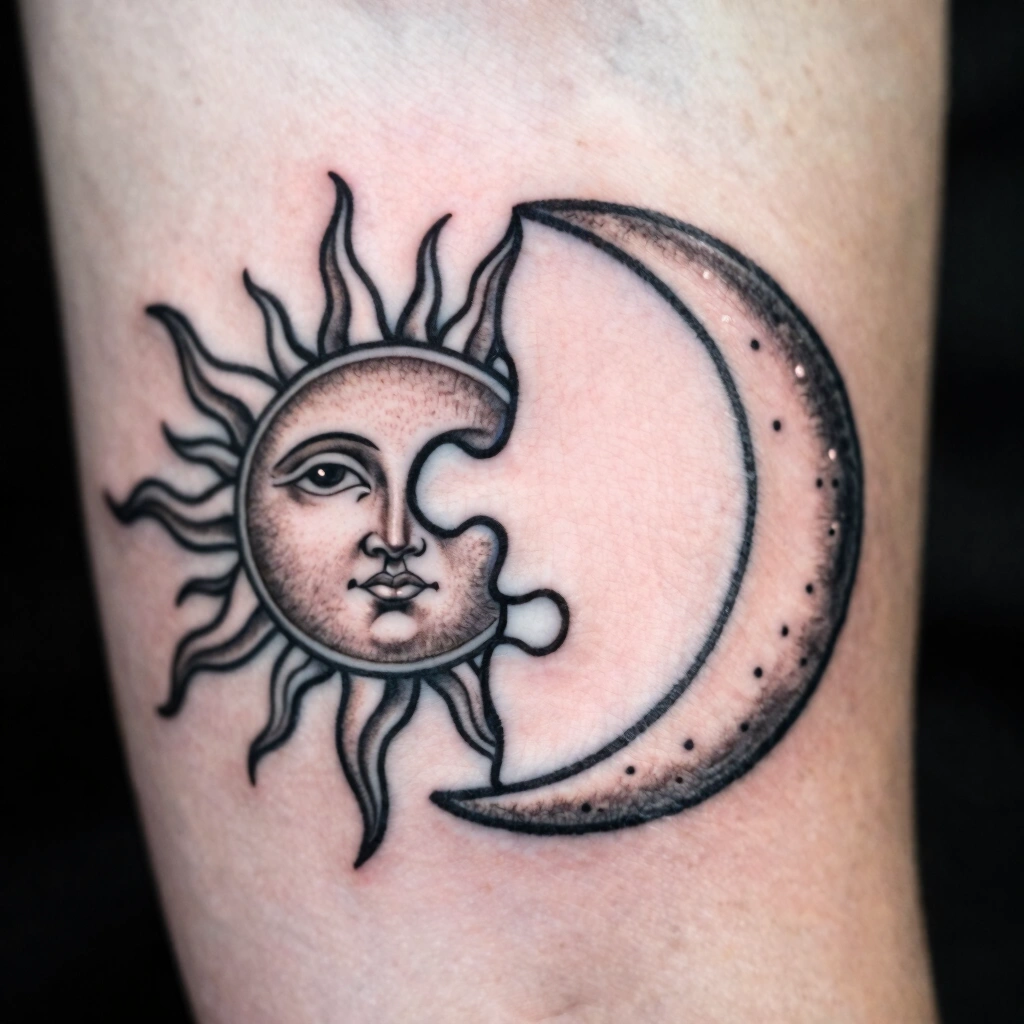
This version literally interlocks — the sun and moon are designed with complementary edges so that if you held both tattoos next to each other, they’d visually connect like puzzle pieces. It’s a fun, clearly “matching” concept that reads well on social media and in person when friends are together. The tricky part is proportion: both artists (or the same artist working on both of you) need to keep the connecting edges identical in scale, which means booking both sessions with the same person if possible. Best on the wrist, forearm, or upper arm for accurate side-by-side comparison. This design is more about the shared concept than individual symbolism, so it’s best suited to friends who want the “we match” statement front and center rather than something more private.
14. Sun and Moon Ankle Tattoos
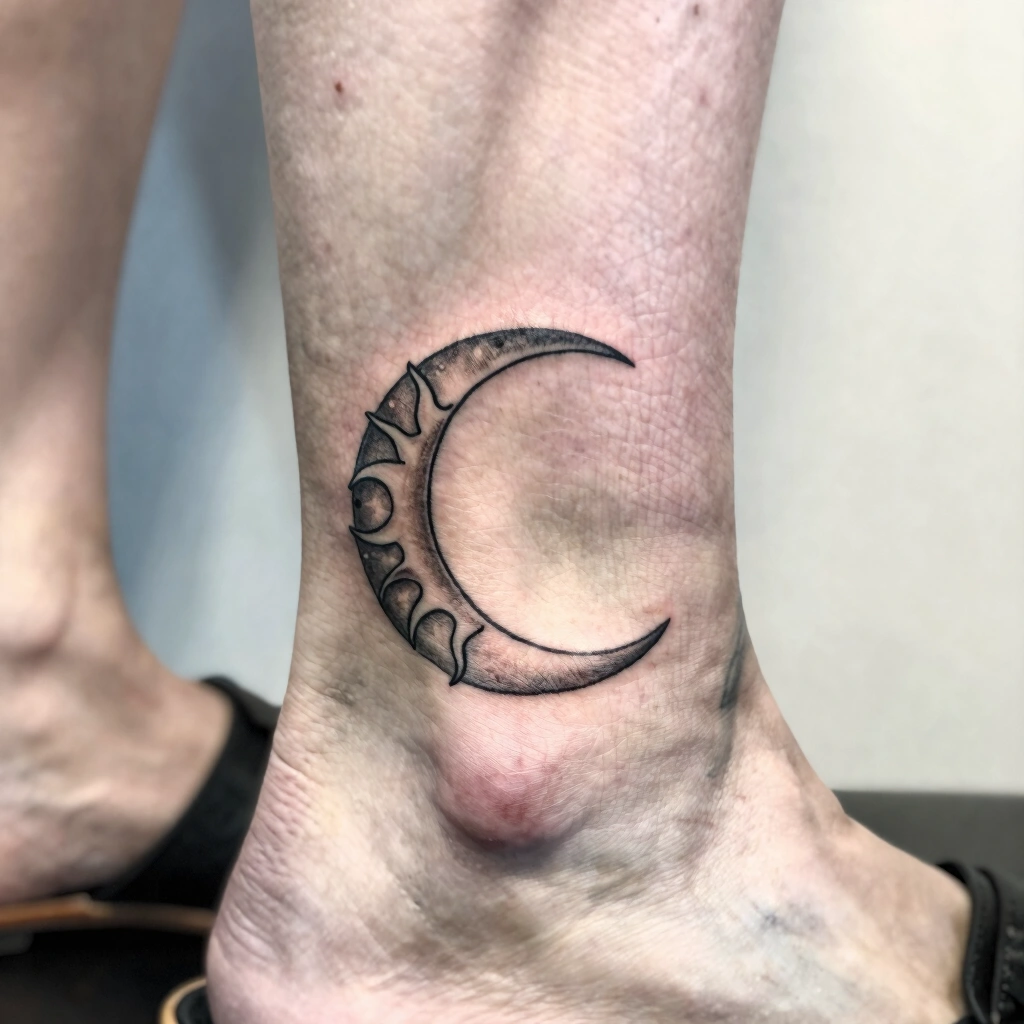
The ankle is a popular but honestly tricky placement — skin here moves constantly with footwear and walking, so healing takes longer than average, often close to 3 weeks, and touch-ups are more common than on flatter areas like the forearm. That said, a small fine-line sun and moon pair (around 1 to 1.5 inches) looks clean here and is easy to hide with socks or shoes for work environments with strict dress codes. Pain tends to run moderate to high since the ankle bone sits close to the surface. If you choose this spot, ask your artist to keep linework slightly thicker than they might elsewhere, since thin lines here are more prone to premature fading from shoe friction.
15. Sun and Moon Finger Tattoos

Finger tattoos are trendy but come with real tradeoffs worth knowing upfront. Skin on the fingers sheds and regenerates faster than most of the body, which means finger tattoos fade and blur noticeably faster than tattoos in almost any other placement — this is a widely acknowledged issue in the industry, not a rare exception. If you still want this look, keep the design extremely simple: a tiny crescent moon on one friend’s finger, a small sun dot with minimal rays on the other. Expect to need touch-ups within a year or two. Discuss this honestly with your artist before booking; a responsible one will tell you the same thing. This option suits people who are fine with more maintenance in exchange for a highly visible, conversation-starting placement.
16. Sun and Moon Rib Cage Duo

Placing the pair along the ribs gives you a larger, more private canvas — great if you want a bigger design (3 inches or more) without visibility at work. This is one of the more painful placements on the list, due to thin skin, close bone proximity, and the stretching that happens every time you breathe. Sessions here often need breaks. Healing can run 3 to 4 weeks, and clothing friction during recovery is a real factor, so loose shirts are worth planning for. Because there’s more room, this is a great spot for the mandala dotwork sun or the detailed Sol y Luna face design mentioned earlier. It’s not a first-tattoo placement for most people — if this is your first ink, consider starting somewhere less sensitive.
17. Sun and Moon Forearm Accent Pieces

The forearm is genuinely one of the most forgiving placements on this list: flat surface, moderate pain, faster healing (often under 2 weeks), and good visibility if you want to show it off, with easy coverage if you don’t. It works for almost every style mentioned above — fine line, blackwork, dotwork, geometric — which makes it a smart default if you’re torn between designs. Sizing is flexible too, from a small 1-inch symbol up to a 4-inch detailed piece. If you’re getting matched tattoos with a friend and want them positioned identically for photos, the forearm’s flat, predictable shape makes side-by-side comparison much easier than curvier spots like the shoulder or ribs.
Best Placement Ideas

- Wrist: High visibility, moderate pain, best for small fine-line or single-needle designs.
- Forearm: Flat, forgiving canvas, works with nearly every style, easy to size up or down.
- Behind the ear: Very discreet, sharper pain than expected due to thin skin, best for tiny single-needle work.
- Ribs: More painful and longer healing, but private and good for larger detailed pieces.
- Ankle: Easy to hide, but higher touch-up needs due to shoe friction and movement.
- Fingers: Most visible day-to-day, but fades fastest — expect maintenance.
- Shoulder blade / upper arm: Good for bold blackwork or traditional color work, moderate pain, less everyday friction.
Tips for Success

Look through an artist’s portfolio for healed photos, not just fresh ink — fresh tattoos always look sharp, but healed results tell you how their linework and shading actually hold up. Confirm whether they specialize in the specific technique you want; a blackwork specialist and a fine-line specialist often have genuinely different skill sets, even in the same studio. Bring at least one clear reference image and be specific about line weight, size, and placement rather than saying “something like this but better.” Ask directly about their sterilization process and needle setup if you’re unsure — a licensed, professional artist should answer this without hesitation. Finally, decide between a walk-in flash design (pre-made, faster, cheaper) versus a fully custom piece (slower, pricier, more personal) before you show up.
Common Mistakes and How to Avoid Them

- Sizing too small for the detail level: Intricate dotwork or script shrinks poorly. Match complexity to size.
- Wrong placement for the linework style: Straight geometric lines struggle on curvy areas like the ribs; plan placement around the design’s shape.
- Skipping aftercare instructions: Fading, patchiness, and infection risk go up when aftercare sheets are ignored.
- Copying a design exactly with zero personalization: Matching doesn’t mean identical — small tweaks (size, angle, added star) keep it meaningful rather than generic.
- Booking based on price alone: A cheaper artist with a thin portfolio in your desired style often costs more later in touch-ups.
Similar Variations

Nearly every design above can be resized down for a minimalist look or scaled up with added shading for a statement piece. Fine-line versions can be converted to blackwork by simply increasing ink saturation and line thickness. Dotwork shading can be swapped for smooth gradient shading if you prefer a softer look without visible dot texture. Color can be added sparingly — a single warm-toned sun with a cooler, untouched moon — without needing a full traditional-style piece. Combining two ideas, like a negative-space moon with radiating fine-line sun rays, is also common and gives your matching set a more custom feel than picking straight from flash sheets.
Aftercare Basics

Aftercare recommendations vary by studio, so always follow the specific sheet your artist gives you over generic internet advice. In general, keep the area clean, avoid direct sun exposure and swimming during initial healing, and avoid picking at any scabbing or peeling. Loose clothing over the tattooed area reduces friction, which matters more for placements like ribs or ankles. Healing time and pain tolerance vary significantly from person to person, so what took a friend two weeks might take you three — that’s normal. If you notice unusual redness, swelling, or discharge beyond what your artist described as typical, consult a licensed dermatologist or your artist directly rather than guessing.
Quick FAQ

How much does a matching sun and moon tattoo cost?
Small fine-line or single-needle designs often run $80–$200 depending on your region and studio minimums. Larger blackwork, color, or detailed mandala pieces can run $200–$500 or more, since they take longer to complete.
How painful is a sun and moon tattoo?
It depends heavily on placement — fleshier areas like the forearm or shoulder tend to be more tolerable, while bony or thin-skin spots like ribs, ankles, and behind the ear are generally more sensitive. Pain tolerance varies a lot person to person.
How long does healing take?
Most small designs heal in 10–14 days on the surface, though full healing underneath can take up to a month. Placement, aftercare consistency, and individual skin all affect this timeline.
Will the design fade or need touch-ups?
All tattoos fade gradually over years, especially with sun exposure. Fine-line and script details fade faster than bold blackwork. Touch-ups every several years are common and normal, not a sign of a bad tattoo.
Picking the right sun and moon tattoo matching best friends design really comes down to being honest about your pain tolerance, your budget, and how much detail you actually want to commit to long-term. Whether you go with a tiny single-needle pair behind the ear or a bold blackwork duo on the shoulder, the meaning stays the same — you’re two halves of something that works better together. Take your time finding a licensed artist whose portfolio matches the style you want, ask the questions this guide walked through, and you’ll end up with matching ink that still feels right years from now.