17 Star Tattoo Designs on the Shoulder Women Actually Love
Nervous about picking a design you’ll regret in five years? Star tattoos on shoulder for women are one of the safest bets in tattoo history precisely because they’ve been reinvented so many times — from tiny single-needle dots to bold blackwork clusters — that there’s a version for almost every personality and pain tolerance.
So what are the best star tattoos on shoulder for women? Fine-line single stars, dotwork constellations, and negative-space clusters work best because the shoulder’s curved, fleshy surface handles small detailed linework well and hides fading better than flatter areas like the wrist. Bold blackwork stars also age well here due to consistent skin tension.
Stick around, because I’m going to walk you through 17 specific design directions, plus real talk on pain levels, healing time, what to bring to your consultation, and the mistakes I see people make before they’ve even sat in the chair.
Why Star Tattoos Work So Well on the Shoulder

I’ve spent enough time around studios to notice a pattern: the shoulder is one of the most forgiving canvases on the body. It’s got enough muscle and fat to cushion the needle, a natural curve that flatters radial designs like stars, and it’s easy to cover or show off depending on your outfit. Stars specifically work because they’re simple shapes — a few connecting lines — so they hold up over decades without turning into a blurry smudge the way overly detailed portraits sometimes do. Whether you want one small star near your collarbone or a full constellation wrapping toward your back, the shoulder gives the design room to breathe.
Before we get into specific designs, it helps to know the difference between the core techniques you’ll hear an artist mention.
Tattoo Technique Glossary
Fine line
: Thin, single-pass linework done with a small needle grouping, usually 1-3 needles. Produces delicate, almost pen-drawn looking stars with minimal shading.
Blackwork
: Solid, saturated black fill with bold outlines. Stars done in blackwork look graphic and high-contrast, almost like a stamped logo.
Dotwork
: Shading and texture built entirely from small dots instead of solid fill or lines. Creates a soft, stippled gradient — great for giving a star a glowing or textured look without going full color.
Single needle
: A specific fine-line approach using one needle point, often used for the most delicate, almost hairline star outlines.
Negative space
: A technique where the tattoo relies on untouched skin to form part of the image, often outlined by surrounding black ink so the star “appears” in the blank area.
Keep these terms in your back pocket — they’ll help you describe exactly what you want instead of just pointing at a Pinterest board and hoping.
1. Fine-Line Single Star Tattoo

This is the design most first-timers gravitate toward, and for good reason. A single star done in fine line uses thin, consistent strokes — usually under 1mm thick — with zero shading, just a clean five-or-six-point outline. It sits well on the front of the shoulder or just below the collarbone at around 1 to 2 inches wide. Skin with visible texture or stretch marks can slightly affect crisp line retention, so ask your artist about needle depth beforehand. Healing typically runs 10 to 14 days for surface peeling, though full settling takes closer to a month. Pain here is moderate — the shoulder cap has more padding than the collarbone, so shifting placement even half an inch can change the sensation. This design is ideal for work environments since it’s easy to keep half-hidden under a sleeve.
2. Scattered Star Cluster (Constellation Style)

Instead of one shape, this design scatters five to eight small stars across the shoulder in a loose, asymmetrical pattern, sometimes connected with a thin dotted line to mimic a constellation map. Dotwork shading between the points adds a soft, starry-sky texture. This works beautifully wrapping from the top of the shoulder toward the upper arm, giving you 3 to 5 inches of usable space. Bring a reference photo of an actual constellation if the design has personal meaning — birth month star charts are a popular request. Expect mild-to-moderate discomfort since the design touches multiple spots, some bonier than others. It ages gracefully because the spacing prevents ink from bleeding together over time.
3. Blackwork Bold Star

If subtlety isn’t your goal, a blackwork star delivers serious visual weight. This uses full black saturation inside thick, confident outlines, giving the star a graphic, almost sticker-like appearance rather than a delicate one. A 2 to 3 inch bold star sits well centered on the shoulder cap where the skin is flattest, helping the solid fill heal evenly. Ask your artist about pass count — bold fill often needs two passes for even saturation. This placement tends to hurt more than fine line because of sustained needle contact over a filled area. It’s a strong choice for anyone who wants a statement piece that reads clearly from a distance, even through light clothing.
4. Dotwork Shaded Star

Dotwork swaps solid fill for thousands of tiny dots that build gradient and texture, giving a star a glowing, almost celestial look instead of a flat outline. This technique takes longer in the chair — sometimes 20 to 30% more time than an equivalent linework piece — so budget accordingly. A 2 inch star with dotwork shading sits nicely on the outer shoulder where light naturally hits the curve, enhancing the shading effect. Bring a black-and-white reference so your artist can gauge how gradual you want the fade. Pain is generally comparable to fine line, though some people find the repetitive dot pattern slightly more irritating over long sessions. This suits people wanting texture without committing to full color.
5. Negative Space Star
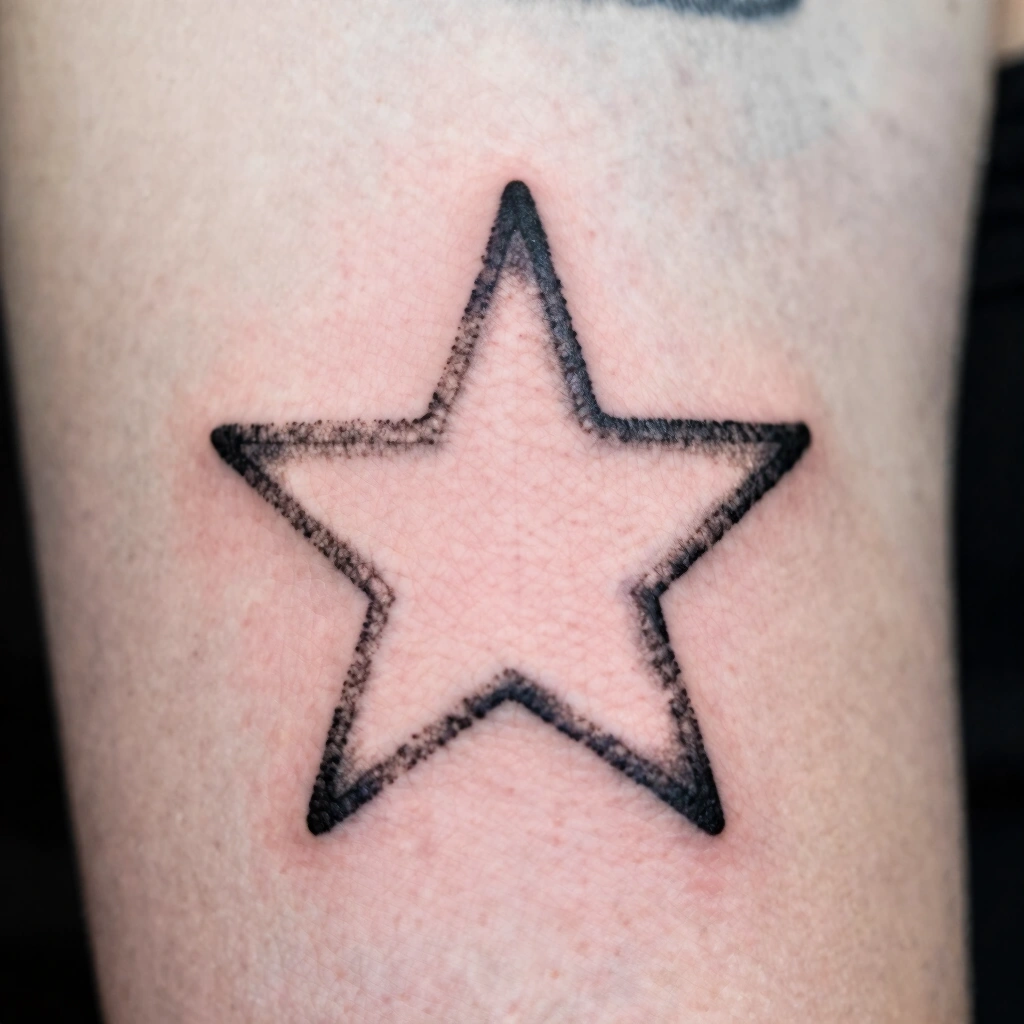
Negative space design flips the usual approach: instead of inking the star itself, the artist inks the space around it, letting bare skin form the star’s shape. It reads as almost glowing against a dark background and looks especially sharp on lighter skin tones where contrast is higher, though a skilled blackwork artist can adapt it for darker skin using thicker surrounding fill. This works best on the flatter part of the shoulder blade area, sized around 2 to 3 inches so the negative shape stays legible. Ask to see healed (not just fresh) portfolio photos of this technique specifically, since negative space tattoos can blur if lines aren’t precise. It’s a striking option for someone who’s already got a tattoo or two and wants something more advanced-looking.
6. Shooting Star with Trailing Line

A shooting star adds motion to the design — a small star with a swooping tail of three to five thinning lines behind it, mimicking a streak across the sky. Fine line technique keeps the tail crisp; too much shading can make it look smudged instead of dynamic. This design flatters the natural slope of the shoulder, running diagonally from the cap toward the upper back, typically 3 to 4 inches long. Tell your artist you want “line taper” — this means the tail should thin out gradually rather than stopping abruptly. Pain is mild for the star portion and slightly more noticeable along the tail if it crosses toward the spine-facing side. It photographs well and works nicely as a solo statement piece or paired with other small designs later.
7. Star and Crescent Moon Combination

Pairing a star with a crescent moon is one of the most requested combinations, symbolically and visually. The moon’s curved negative space balances the star’s sharp points, and most artists render this in fine line with light dotwork shading inside the moon for dimension. This combo fits nicely just below the collarbone or on the front of the shoulder, sized around 1.5 to 2.5 inches total. If personal meaning matters to you, tell your artist the specific moon phase you want represented — waxing, waning, or a simple crescent — since each carries different symbolism. Discomfort is on the lower end for this placement. It’s a solid first-tattoo option because the combined shape stays visually interesting without needing much size.
8. Nautical Star (Traditional Bold)

The nautical star is a classic in American traditional tattooing — a five-pointed star with alternating shaded and unshaded sections, giving it a pinwheel-like depth. Bold black outlines and solid color blocking (traditionally navy blue or black) define this style, and it holds up remarkably well over decades because traditional tattooing was literally built around longevity through thick lines and high contrast. A 2 to 3 inch nautical star centered on the shoulder cap is the classic placement. If you want it to look authentic rather than trendy, ask specifically for “American traditional shading,” not a modern reinterpretation. Pain runs moderate given the solid color fill. This design suits anyone who wants a design with real tattoo history behind it.
9. Zodiac Constellation Map

Rather than a generic star cluster, this design uses the accurate star pattern of a specific zodiac sign, connected with thin lines exactly as the constellation appears in the sky. It’s typically done in fine line with tiny dots marking each star point. This works well running along the upper shoulder toward the shoulder blade, giving enough length — around 3 to 4 inches — for the constellation’s real shape to read clearly. Bring an accurate star chart, not just a stylized zodiac symbol, so your artist can trace the real formation. Pain is mild to moderate depending on how far the design stretches toward bonier areas. It’s a meaningful option for matching tattoos between family members with different signs.
10. Watercolor-Style Star Splash

This design uses a solid black or fine-line star outline with soft, translucent color washes bleeding outward, mimicking a watercolor painting. It’s more advanced technically because color saturation has to be controlled carefully to avoid looking muddy after healing. A 2 to 3 inch star with color splash works best on the flatter upper shoulder for even ink distribution. Ask your artist about their specific experience with color healing and fading, since colored ink can shift slightly over years more than solid black work. Pain is comparable to blackwork due to the added color passes. This design fits people who want something bold and artistic rather than minimal or symbolic.
11. Geometric Star with Line Patterns

This version turns the star into a more architectural design, surrounded by straight linework, triangles, or a subtle sacred-geometry frame. Fine to medium line weight keeps the geometric elements crisp, and there’s usually no shading at all — the visual interest comes purely from precise linework and symmetry. A 2.5 to 3.5 inch design centered on the shoulder cap gives the geometry enough room to stay proportional. Because symmetry is everything here, ask to see a stencil preview before the session starts, and check it in a mirror from multiple angles. Pain is moderate, mostly from the extended session length needed for precise straight lines. This design suits people drawn to structured, modern-looking tattoos over soft or whimsical ones.
12. Star Wrapped Around the Shoulder Cap

Instead of sitting flat, this design wraps partially around the curve of the shoulder, using the body’s natural shape to add dimension to the star’s points. It’s usually done in bold blackwork or fine line, sized larger — 3 to 5 inches — to make full use of the wraparound space. This placement requires an artist comfortable working on curved surfaces, so check their portfolio specifically for shoulder-wrap pieces, not just flat forearm work. Expect moderate discomfort since the design crosses both fleshier and slightly bonier sections. It’s a strong choice for anyone who wants a design that looks different depending on the angle you view it from — a subtle showcase piece for tank tops or off-shoulder outfits.
13. Micro Star Trio

Three tiny stars, each under half an inch, arranged in a diagonal or scattered line near the top of the shoulder. Single-needle technique keeps these extremely delicate, almost like freckles made of ink. This is one of the most beginner-friendly options on this list because of low commitment — size, pain, and healing time are all minimal. Ask your artist specifically about “single needle” versus standard fine line, since micro designs benefit from the thinnest needle grouping available. Pain is generally mild given the small surface area. This works great for matching tattoos with friends or family members, since the design is simple enough to replicate consistently across different people’s skin.
14. Star with Floral Accents

Combining a star with small botanical elements — a sprig of leaves, a single flower bud — softens the sharp geometry of the star and adds a personal, decorative feel. This is usually done in fine line with light dotwork shading on the petals for dimension. A 2 to 3 inch combined design fits nicely on the front or top of the shoulder. Bring two separate reference images — one for the star style, one for the specific flower — so your artist can merge them into one cohesive custom design rather than a generic flash piece. Pain is mild to moderate. This design works well for anyone wanting symbolism tied to a specific flower (birth month, memorial, personal meaning) layered with the star’s own significance.
15. Star Mandala

This design surrounds a central star with a radial mandala pattern — repeating geometric or floral shapes arranged in a circle. It demands precise linework and symmetry, often taking longer in the chair than a standalone star. Best sized at 3 inches or larger so the intricate detail doesn’t blur together as it heals. This placement fits well on the flatter section of the upper shoulder blade. Because mandala precision is unforgiving, look specifically for portfolio pieces showing healed (not just fresh) mandala work to judge how well the artist’s fine lines hold up over time. Pain runs moderate to high simply due to session length. This design suits people who already have some tattoos and want a more intricate centerpiece.
16. Sketch-Style Star

This design deliberately mimics pencil-sketch aesthetics — slightly uneven linework, cross-hatching instead of smooth shading, and an intentionally rough, hand-drawn look. It’s a specialty style, so not every artist offers it; you’ll want to search specifically for “sketch style” or “etching style” in an artist’s portfolio. A 2 to 3 inch star in this style works well on the front shoulder where the sketch lines stay visible without stretching. Pain level is similar to standard fine line work. This design appeals to people who want something that looks artistic and unique rather than clean and symmetrical — it stands out precisely because it doesn’t look like a typical stencil.
17. Star with Script or Text
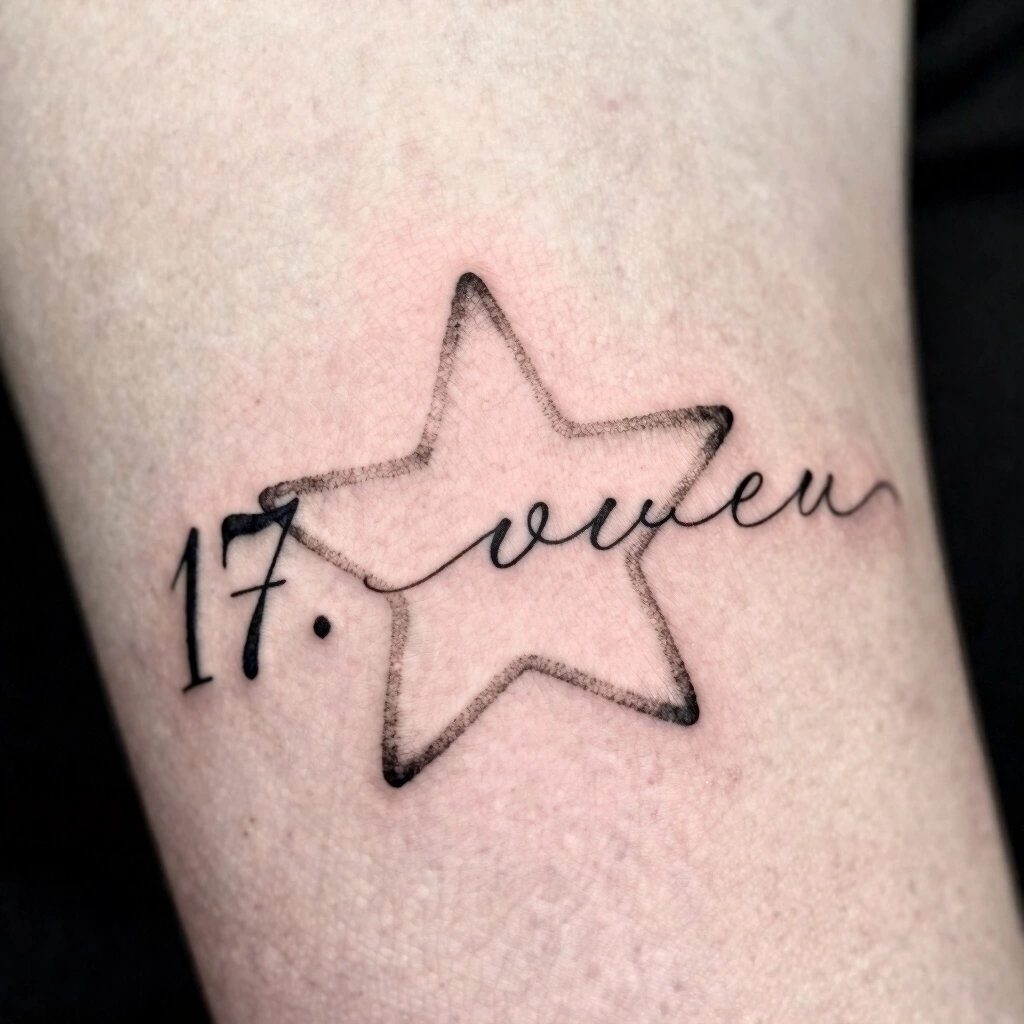
Pairing a small star with a word, name, or short phrase in fine-line script personalizes the design significantly. The star often sits as a small accent above or beside the lettering rather than as the main focus. This combo fits well along the collarbone-to-shoulder line, sized to fit the text length — usually 2 to 4 inches total. Bring a printed sample of the exact font or handwriting style you want, since script tattoos vary enormously by lettering weight and spacing. Pain depends on exact placement, with collarbone-adjacent skin generally reading as more sensitive. This design works well for meaningful dates, names, or short mantras paired with the symbolic star.
Best Placement Ideas

- Front of shoulder / near collarbone — highly visible, moderate pain due to thinner skin, easy to show off or cover with a shirt.
- Top of shoulder cap — moderate visibility, more padding so generally more comfortable, ideal for bold or larger designs.
- Back of shoulder toward the blade — easy to hide, flatter surface great for symmetrical or geometric designs, slightly harder for touch-ups since you can’t see it directly.
- Wrapping toward the upper arm — great for larger or multi-element designs, visibility depends on sleeve length, moderate discomfort as it crosses different skin textures.
Tips for Success

Look for an artist whose portfolio shows multiple healed examples of the specific technique you want — fine line, dotwork, blackwork, whichever applies — not just fresh, glossy photos straight off the needle. Healed work tells you how their linework actually holds up. Bring reference images, but don’t expect an exact copy of someone else’s tattoo; a good artist will adjust proportions to fit your skin and shoulder shape. During your consultation, ask directly about needle size, expected session length, and their approach to touch-ups if the design needs a refresh after healing. If you’re deciding between a walk-in flash design and a custom booking, know that custom work usually costs more and takes longer to schedule, but gives you a design that’s genuinely yours.
Common Mistakes and How to Avoid Them

- Going too small for detailed designs. Intricate dotwork or mandala patterns need enough size to stay legible as they age — under an inch, fine details often blur together within a few years.
- Ignoring placement geometry. A design meant to wrap around a curve will look distorted if forced onto a flat reference photo without adjustment.
- Skipping aftercare instructions. Not following your artist’s specific aftercare sheet can affect how crisp the final healed result looks.
- Copying a design exactly. Personalizing size, spacing, or small elements makes the tattoo feel like yours instead of a duplicate from someone’s Instagram.
- Choosing price over portfolio. The cheapest quote isn’t always the best value if the artist’s linework doesn’t match the precision your design needs.
Similar Variations

Most of these designs scale up or down easily — a bold blackwork star can shrink into a micro single-needle version, and a simple fine-line star can gain a dotwork shading upgrade later as an anniversary touch-up. Combining ideas works too: a shooting star tail added to a zodiac constellation, or floral accents wrapped into a mandala star. If you’re unsure about commitment, most artists can start with a smaller, simpler version now and build onto it during a future session.
Aftercare Basics

General aftercare guidance includes keeping the area clean, avoiding direct sun exposure while healing, and skipping swimming pools or soaking baths until the surface fully closes. Avoid picking at any peeling skin, since this can affect how evenly the ink settles. Every studio provides a specific aftercare sheet tailored to their products and your skin — always follow that over generic internet advice, and reach out to your artist or a licensed dermatologist if you notice anything that seems unusual during healing.
Quick FAQ

How much does a star tattoo on the shoulder typically cost?
Small, simple fine-line stars often fall in a lower price bracket since they take less chair time, while detailed dotwork, mandalas, or color pieces cost more due to added session length. Exact pricing varies widely by studio, region, and artist experience, so always ask for a quote during consultation.
Does a shoulder star tattoo hurt a lot?
Pain tolerance varies by individual, but the shoulder is generally considered a moderately comfortable placement compared to bonier areas like the wrist or ribs. Designs closer to the collarbone tend to feel more sensitive than the fleshier shoulder cap.
How long does healing take?
Surface healing typically takes around two weeks, with full settling under the skin taking closer to a month. Healing time can vary based on aftercare, skin type, and design size, so following your artist’s instructions closely matters.
Will a small star tattoo fade or blur over time?
All tattoos fade gradually with age and sun exposure, but simple, well-spaced linework tends to hold its shape longer than tightly packed detailed designs. Occasional touch-ups can refresh lines and saturation years down the road.
Choosing from these star tattoos on shoulder for women options really comes down to matching the technique to your pain tolerance, lifestyle, and how much detail you want holding up on your skin for years to come. Whatever direction you pick, take the time to find an experienced, licensed artist whose healed portfolio backs up the style you’re after — that one decision matters more than any single design choice on this list.