16 Flower Shoulder Tattoo Ideas That Actually Hold Up Over Time
Thinking about a flower shoulder tattoo but worried you’ll pick the wrong style, size, or artist? You’re not alone — the shoulder is one of the most requested spots for floral work, and that means there’s a lot of noise out there mixing real advice with pretty pictures and nothing else.
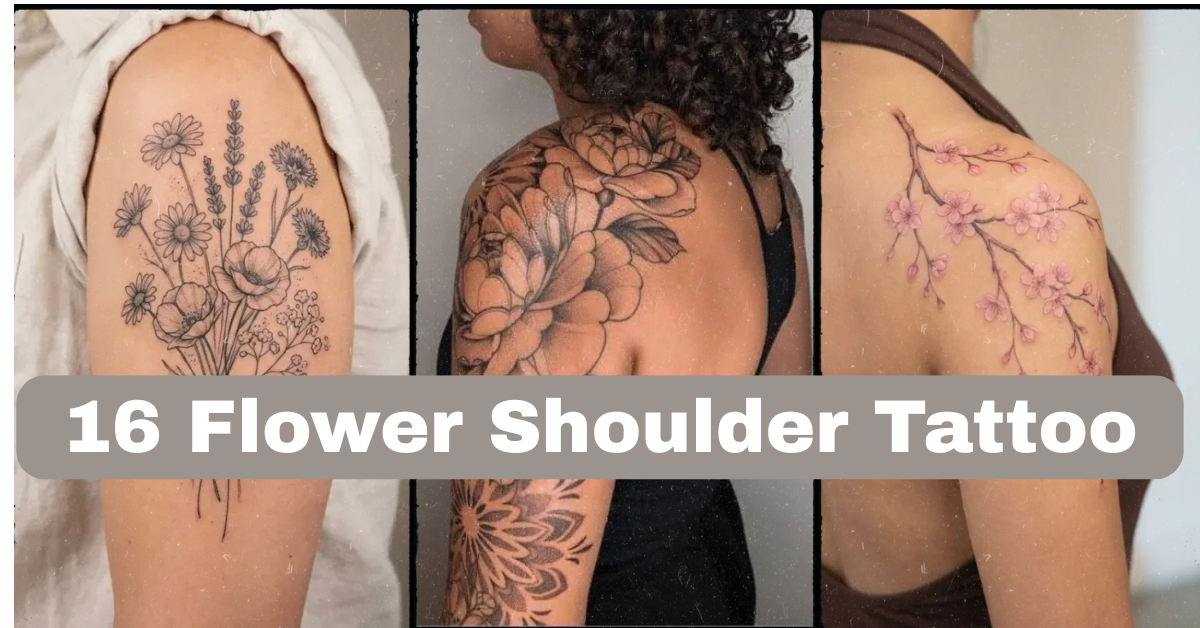
So what are the best flower shoulder tattoo ideas? Fine-line florals, blackwork blooms, dotwork clusters, and negative-space petals all work well on the shoulder because the flat, curved surface shows off linework and shading without much distortion. Size and placement on the shoulder cap versus the back of the shoulder change how much detail survives long-term.
Stick around, because I’m going to walk you through pain levels by placement, what things actually cost, how to brief an artist so you don’t end up with a generic flash-sheet flower, and how each of these designs tends to look five years down the road — not just on day one.
Why the Shoulder Works So Well for Floral Tattoo Designs
The shoulder is basically a tattoo artist’s dream canvas for flowers. It’s got a natural curve that mimics the way petals fold and overlap, there’s enough flat surface area for detail work, and it’s one of the few spots on the body that’s easy to cover for work but easy to show off at the beach. It also sits over a fairly muscular, low-friction area, which matters more than people realize — designs there tend to hold their crispness longer than pieces on high-movement joints like elbows or knees. That’s not a guarantee, just a general pattern artists notice over years of touch-up appointments.
Fine Line vs. Blackwork vs. Dotwork: Know the Difference Before You Book
Before we get into specific designs, it helps to actually understand what these technique names mean, because “I want something delicate” means very different things to different artists.
- Fine line / single needle: Uses a very thin needle configuration to create hair-thin, delicate lines with little to no shading. Looks like a pencil sketch. Fades faster and softens sooner than bolder work.
- Bold traditional: Thick, confident outlines paired with solid color fills. Built to stay legible for decades — this is the style that ages the “best” in terms of visibility.
- Blackwork: Solid black ink used for large shapes, silhouettes, or heavy shading. High contrast, strong visual weight.
- Dotwork: Shading and texture built entirely from tiny individual dots instead of solid shading or lines. Creates a soft gradient or stippled texture effect.
- Negative space: The design uses the untouched skin itself as part of the image — the “shape” is implied by what’s left blank, not what’s inked.
Keep these definitions in mind as you scroll. Every flower idea below leans on one or more of these techniques, and knowing the vocabulary will make your consultation with an artist ten times more productive.
1. Fine-Line Single Rose Cap
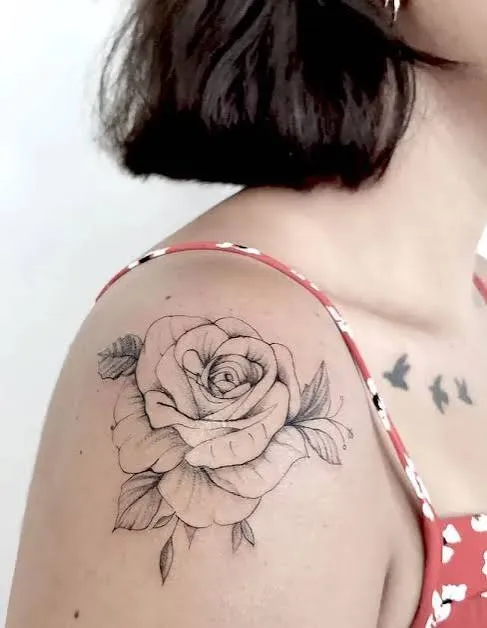
A single rose done in fine line sits beautifully right on the curve of the shoulder cap, where the natural roundness of the body mimics the curl of the petals. The linework here is thin and consistent, usually without shading, so the rose reads more like an illustration than a painting. This works best at 2.5 to 4 inches — smaller than that and the petal detail starts to blur together after a few years. Skin with a lot of texture or visible pores can cause fine lines to look slightly less crisp over time, something worth asking your artist about honestly. Pain-wise, the shoulder cap is fairly forgiving compared to bonier spots. This is a strong first-tattoo choice and reads as professional enough for most workplaces. From here, let’s look at how the same linework style scales up into something bigger.
2. Blackwork Floral Mandala Wrap
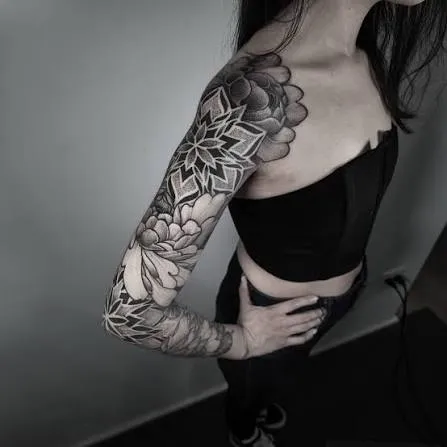
If you want something that commands attention, a blackwork mandala built from layered flower shapes wrapping around the shoulder is the move. This uses solid black fill combined with geometric petal repetition, creating heavy contrast against the skin rather than relying on fine detail. Because it’s saturated black rather than thin lines, it holds up remarkably well over the years — solid black doesn’t blur the way fine gray shading can. Plan for 4 to 6 inches minimum so the geometric pattern doesn’t collapse into a blob. This design suits the back of the shoulder and upper arm transition, and it takes longer in the chair since solid fill is slower to complete than outline work. Expect more discomfort here since heavier saturation means more repeated passes over the same skin. It’s a bold statement piece, less discreet than the rose, and better suited to people who don’t need to hide it for work. Next, a softer, textured take on floral shading.
3. Dotwork Wildflower Cluster
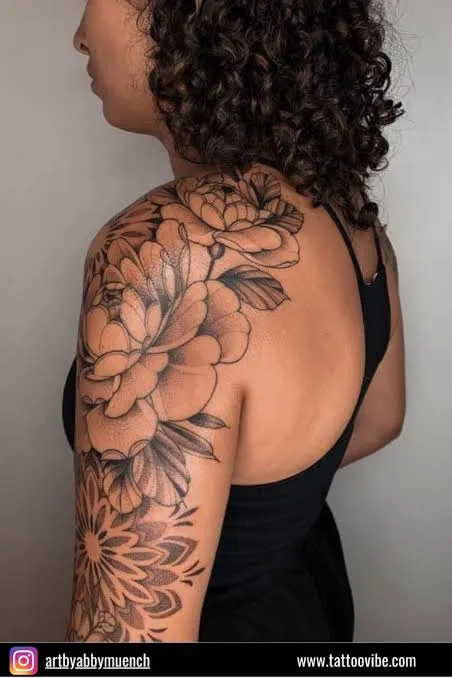
Dotwork wildflowers use hundreds of tiny dots instead of solid shading to build up soft gradients across each petal, giving the flowers a slightly hazy, almost watercolor-adjacent texture without using actual color. This technique takes a patient hand and a steady artist — ask to see healed (not just fresh) photos in their portfolio, since dotwork shading is where sloppy technique shows up first. A cluster like this works well scattered across the back of the shoulder blade area, sized around 3 to 5 inches for the whole grouping. Healing takes a bit longer to settle visually since the dot pattern needs to fully set before the gradient looks smooth — usually a few weeks. Dotwork tends to sting a bit more than straight linework because of the repeated needle contact in small areas. This one’s a great option if you want texture and depth without full color saturation. Let’s move to a bolder, more traditional petal.
4. Watercolor Peony Splash

Watercolor-style peonies use soft color blending and blurred edges to mimic the look of actual paint bleeding on paper, often layered under or around a fine-line flower outline to keep the shape from disappearing entirely. This is one of the more advanced techniques to execute well — color saturation fades faster than black ink, so realistic expectations matter here. A qualified colorist will usually recommend sizing at least 4 inches so the color blocks don’t muddy together. The shoulder blade and upper arm blend zone works nicely because the curve helps the color “flow” visually. Because color work involves more passes, sessions run a little longer than blackwork of the same size, and the sensation is often described as more of a persistent burn than a sharp sting. This is not the best pick for someone wanting a low-maintenance first tattoo, since color pieces are more likely to need a touch-up down the line. Next up, a quieter approach using empty space.
5. Negative-Space Lotus Bloom
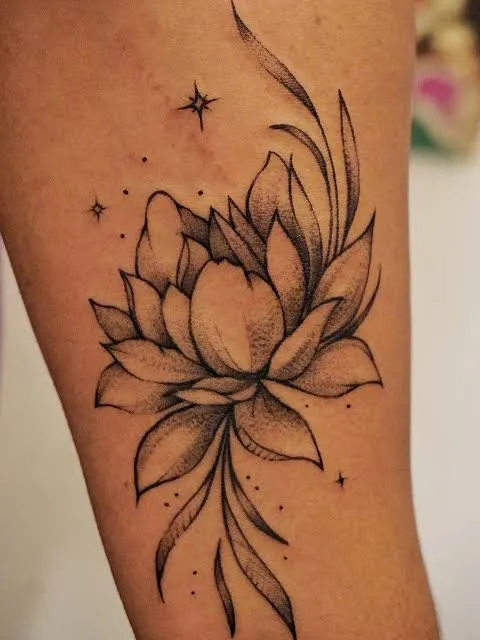
Negative-space work flips the usual approach — instead of inking the flower shape, the artist inks the space around it, letting your actual skin tone form the petals. A lotus rendered this way against a solid or dotwork black background looks almost like it’s glowing. This technique demands precise linework at the borders, so the edges need to stay razor clean or the flower shape reads as messy rather than intentional. Best placed on the flatter part of the upper shoulder where there’s minimal stretch, sized 3 to 5 inches. Skin tone matters more here than with any other style on this list — deeper skin tones create a different contrast effect than lighter tones, so bring reference photos on similar skin during your consultation. Pain sits in the moderate range since there’s usually solid black fill involved. It’s a striking, memorable choice for someone who’s already got a few tattoos and wants something more conceptual. Now let’s talk about a design built for storytelling.
6. Fine-Line Wildflower Bouquet with Script
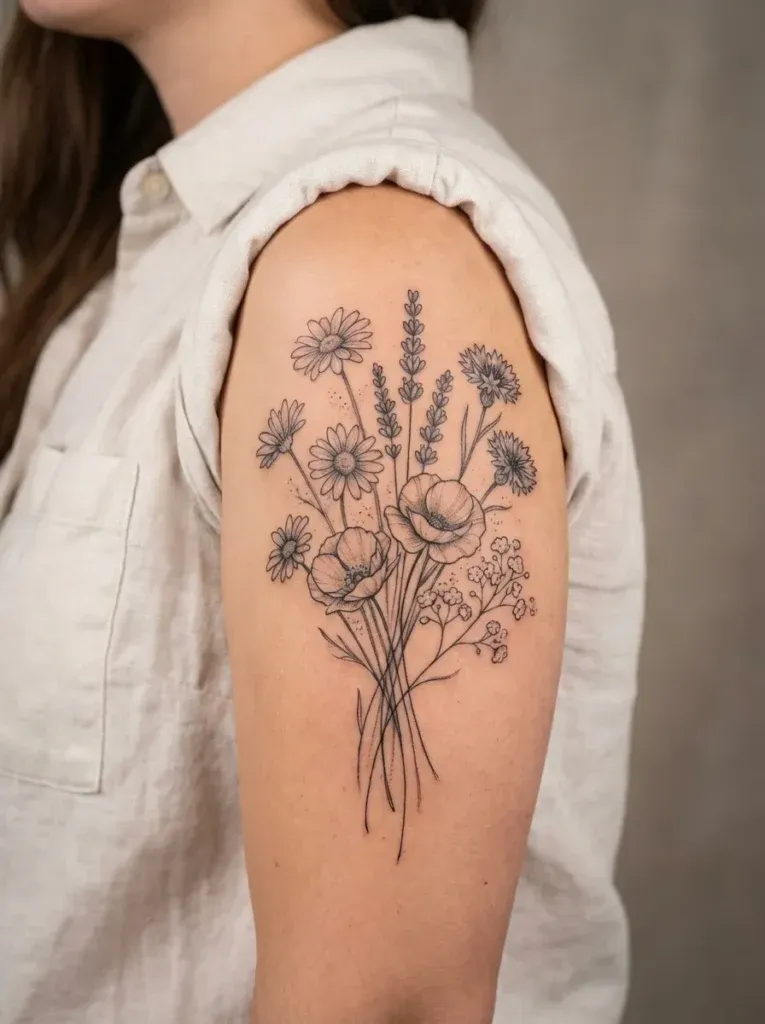
Combining a loose, hand-tied bouquet of wildflowers with a short line of script adds a personal, narrative element — a name, date, or word tucked among the stems. The linework stays thin throughout, and shading is minimal or entirely absent to keep the composition airy. Script that small needs to be briefed carefully: bring a specific font reference, not just “cursive,” because line thickness in lettering affects legibility more than people expect. This works well angled diagonally across the front of the shoulder toward the collarbone, sized around 4 to 6 inches to keep both the flowers and the words readable. Healing is typically quicker than heavier work since there’s less trauma to the skin overall. This design ages best when the script stays short — long sentences in fine line tend to blur first. It’s popular for meaningful, symbolic first tattoos. From delicate script, let’s shift to something with real visual punch.
7. Bold Traditional Sunflower
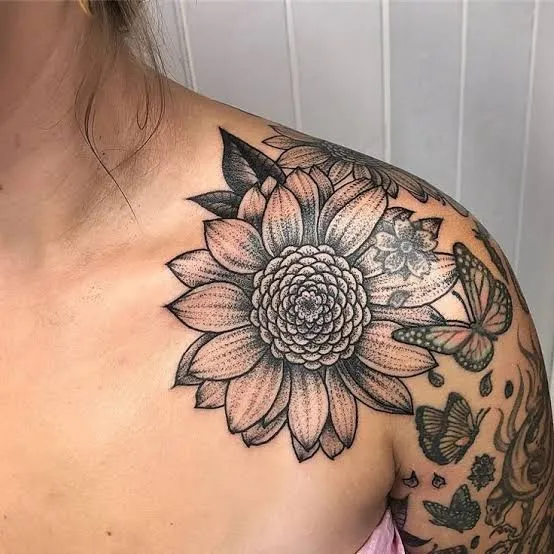
A sunflower in bold traditional style uses thick black outlines and solid color fill — deep yellows, rich browns — in the classic American traditional tattoo tradition. This is the style built to last: heavy linework and solid color blocks resist the softening effect that fine detail experiences over the years. Because the outline does the heavy lifting, this design stays legible even at smaller sizes, around 3 to 4 inches, which makes it a solid choice for someone newer to tattoos who still wants visible color. Placement on the rounded part of the shoulder cap lets the circular flower shape sit naturally. Expect moderate discomfort, mostly from the solid fill sessions rather than the outline itself. This design reads well in professional settings when placed slightly higher and covered by short sleeves. It’s also a strong candidate for a walk-in flash booking rather than a fully custom piece, since traditional flash sheets are common in most shops. Let’s scale things down for a more minimal option next.
8. Minimalist Daisy Chain Trail
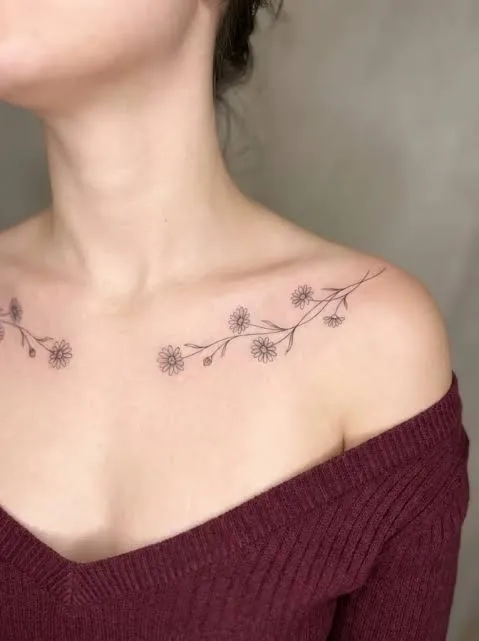
A trail of small daisies connected by a thin stem line running from the shoulder toward the collarbone or down the arm is one of the most low-commitment floral options out there. Each flower is simple — a small center dot, five to six petal outlines, no shading — done in single-needle fine line. Because each element is small, ask your artist about line spacing during the stencil stage; petals placed too close together can blur into each other as the tattoo settles. Ideal size per flower is under an inch, with the whole trail running 4 to 7 inches depending on placement. This is genuinely one of the least painful options on this list since there’s no shading or solid fill involved. It’s an easy “yes” for a first tattoo, and it hides well under short sleeves for work. Next, let’s look at a design that leans into a seasonal, cultural motif.
9. Cherry Blossom Branch Cascade
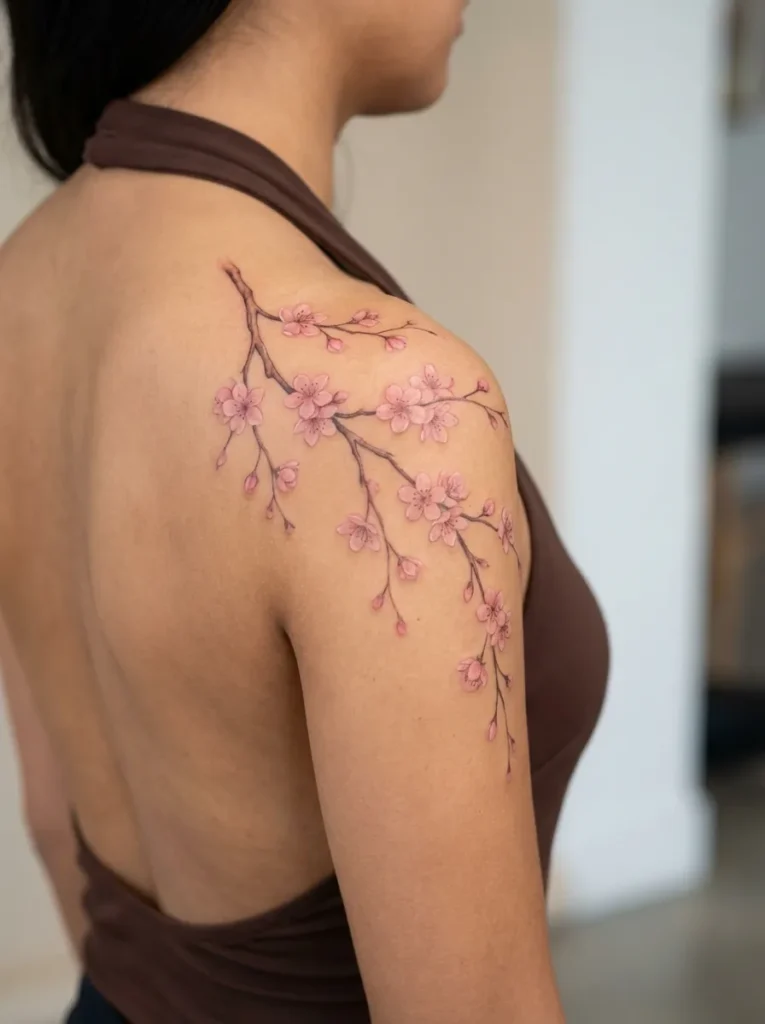
A cherry blossom branch curving over the top of the shoulder and trailing down the arm uses small, layered petal clusters connected by a thin branch line, usually done in fine line with light pink or soft black shading for depth. The petals themselves are simple five-point shapes, but the overall composition takes real planning to avoid looking cluttered — ask to see a digital stencil mock-up before your appointment so you can check the branch flow against your actual shoulder shape. This piece works well sized 5 to 8 inches to let the cascade breathe. Discomfort is generally mild to moderate, increasing slightly where the branch crosses over the more sensitive collarbone-adjacent skin. This design ages gracefully since the individual petal shapes are simple enough to stay clear even as fine lines soften slightly over the years. It suits both first-timers and people adding onto existing shoulder or arm work. Now let’s look at a more geometric, structured floral approach.
10. Geometric Flower Overlay
This design layers a realistic or semi-realistic flower over or inside a geometric shape — a hexagon, triangle, or circle — using clean straight lines contrasted against the organic curves of the petals. The geometric outline is typically bold and solid, while the flower inside might use fine line, dotwork shading, or even a touch of negative space. This contrast between rigid and organic shapes is what makes the design visually interesting rather than just “a flower.” Sizing around 3 to 5 inches keeps both elements legible. Placement on the flatter section of the shoulder helps keep the geometric lines straight rather than warped by the body’s curve. Pain level depends on how much solid fill is in the geometric border — more fill generally means more sensation. This is a good pick for someone who wants floral meaning but a more modern, structured look rather than something soft or romantic. Let’s move to a design built around realism.
11. Shaded Realism Rose with Thorns
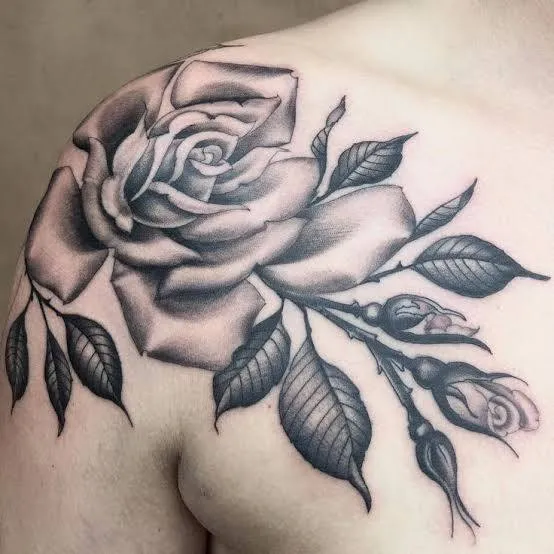
A realistic rose rendered with smooth gradient shading and visible thorns along the stem is one of the more technically demanding designs on this list, since it relies on smooth transitions between light and dark rather than hard outlines. This requires an artist experienced specifically in shaded realism — their portfolio should show consistent gradient work, not just bold linework, so look closely at healed photos before booking. Because shading needs room to transition properly, this design rarely works well under 4 inches. The back of the shoulder, where skin is flatter, holds gradient shading more evenly than the curved cap. Expect a longer session and a higher pain rating than most designs here, since repeated shading passes add up. This is a striking option for someone with at least one tattoo already, since it’s a bigger commitment in time and cost. From heavy shading, let’s look at a design built for gradual growth.
12. Chrysanthemum Sleeve Cap Transition
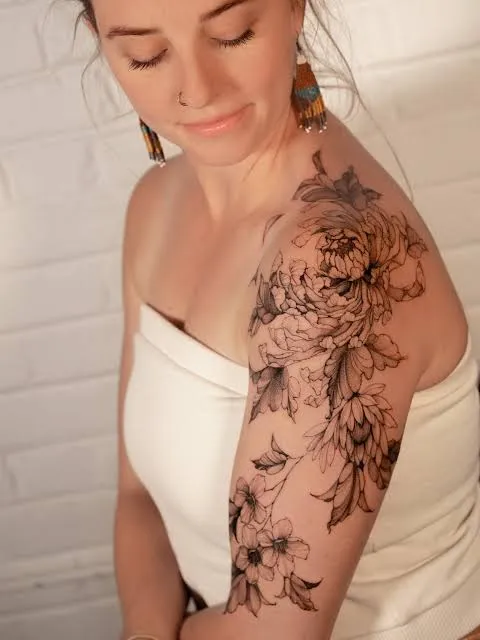
If you’re thinking about eventually extending into a half sleeve, a chrysanthemum positioned right at the shoulder cap can act as a visual transition point, using layered petal linework with light dotwork or fine shading to add dimension without full color saturation. Bring reference photos showing how you’d want the design to eventually connect to future arm work, even if you’re only getting the shoulder piece now — this helps the artist leave room in the composition. Sizing typically runs 4 to 6 inches for the flower alone. This spot involves a mix of flatter and curved skin, so expect a moderate, fairly even pain level throughout. It’s a smart choice if you know you want more tattoos later but aren’t ready to commit to the full piece yet. Next, something delicate enough to almost disappear.
13. Delicate Baby’s Breath Scatter
Tiny baby’s breath clusters — small circular blooms on thin branching stems — scattered loosely across the shoulder use extremely fine single-needle work with essentially no shading. This is about as subtle as floral tattoos get, and that subtlety is exactly the appeal for people who want something tattooed without it reading as a “big” tattoo. Because the linework is so thin, ask specifically what needle size your artist plans to use — anything too thick will make these delicate blooms look heavy-handed instead of airy. Keep the scatter within a 3 to 5 inch area to avoid it looking sparse or disconnected. This is genuinely one of the lower-pain options here. It’s an easy pick for first-timers, though it’s worth knowing extremely fine work like this tends to soften the fastest of anything on this list, so touch-ups come sooner. Let’s look at a bolder, more sculptural bloom next.
14. Orchid Statement Piece
An orchid, with its layered, almost sculptural petal structure, gives an artist room to combine fine outline work with selective solid shading on the inner petals for depth and contrast. This isn’t a flash-sheet flower — it benefits from a custom stencil tailored to your specific shoulder shape, so this is a good candidate for a custom booking rather than a walk-in. Sizing around 4 to 6 inches lets the layered petals stay distinct from each other. Placement toward the back of the shoulder, wrapping slightly toward the shoulder blade, uses the body’s curve to echo the orchid’s natural twist. Pain runs moderate, with the shaded inner petals feeling more intense than the outline. This design holds long-term visual interest because of its layered structure — it doesn’t read as “just a flower,” which appeals to people wanting something a little less common. Now, let’s close with a design that blends floral and celestial themes.
15. Floral Constellation Blend
This design threads small dotwork “stars” and thin connecting lines between a cluster of small flowers, blending a botanical theme with a celestial one. The flowers themselves stay simple — fine-line outlines, minimal shading — so the dotwork stars don’t visually compete with them. This is a genuinely custom concept; bring a rough sketch or a written description of which flowers and which star pattern matter to you personally, since this isn’t something you’ll find on a standard flash sheet. Sizing around 4 to 7 inches gives enough room to scatter both elements naturally across the shoulder. Pain stays fairly moderate throughout since neither element involves heavy solid fill. This design works well as a symbolic piece — flowers representing people or memories, stars representing dates or locations. It’s a meaningful option for anyone wanting personal symbolism without an obvious literal image. Last on our list is a design built specifically for group or matching tattoos.
16. Matching Single-Stem Flower Set
For friends, siblings, or couples wanting a shared piece, a simple single-stem flower — one bloom, one or two leaves, done in fine line — placed identically on each person’s shoulder makes for an easy, low-commitment matching tattoo. Keep the design under 2 inches so it stays quick to complete and gentle on the wallet for a group booking. Ask your artist whether they can tattoo everyone in the same sitting, since consistency in line weight matters more for matching sets than for a standalone piece. Pain is minimal given the small size and lack of shading. This is one of the most beginner-friendly options on this entire list, and it ages evenly across a group since everyone’s healing under similar conditions and the design itself is so simple. With all sixteen ideas covered, let’s talk about turning any of these into a real appointment.
Best Placement Ideas
Where exactly on the shoulder you go matters more than most people think. Here’s how the common zones break down:
- Shoulder cap (top, rounded part): Most visible, easiest to show off, moderate pain — good for bold or medium-sized single flowers.
- Back of shoulder blade area: More private, flatter surface great for shading and dotwork detail, slightly more moderate pain due to thinner skin in some people.
- Front, toward the collarbone: Great for script-and-flower combos, more visible in tank tops, tends to be a bit more sensitive.
- Wrap toward the upper arm: Best for larger or transitional pieces meant to grow into a sleeve later, longer session times, moderate to higher pain due to sustained sessions.
Tips for Success
Start by actually researching your artist, not just the design. Look through their portfolio for the specific technique you want — if you’re after fine line, you want to see multiple examples of fine line, not just one photo. Check healed photos, not only fresh ones straight out of the chair, since that’s what the tattoo actually looks like once it settles. Bring reference images that show line weight and size, not just “vibe” photos pulled from a mood board. During your consultation, ask directly about needle size, whether they’re doing a custom stencil or working from flash, and roughly how many sessions your design will need. A good artist will talk you through placement tradeoffs honestly, not just say yes to whatever you ask for.
Common Mistakes and How to Avoid Them
- Going too small for the detail level. Fine shading and layered petals need real space — cramming that detail into 2 inches usually means it blurs into a smudge within a couple of years.
- Choosing a placement that fights the design’s flow. A design meant to curve with the shoulder will look off if forced onto a flat section, and vice versa.
- Skipping the artist’s aftercare instructions. Every studio’s process is slightly different; following a generic internet guide instead of what your specific artist gave you can affect how the final result looks.
- Copying a reference photo exactly. A good artist will personalize proportions to fit your actual body shape — an identical copy of someone else’s stencil rarely sits the same way on different skin.
- Not asking about touch-ups upfront. Fine line and color work in particular often need a touch-up session within the first year; ask if that’s included before you book.
Similar Variations
Almost every idea on this list can be resized or recombined. A bold traditional sunflower can shrink down into a minimalist single-line version for a smaller budget. A dotwork wildflower cluster can drop the dots entirely and become pure fine-line outline work for less sensation and a lower price. Negative-space designs can be flipped into solid blackwork versions, and vice versa. Matching sets can borrow from any design on this list as long as everyone agrees to keep the sizing and line weight consistent. Think of these sixteen ideas less as fixed templates and more as a starting vocabulary to bring into your consultation.
Aftercare Basics
General aftercare guidance from most professional studios includes keeping the area clean, avoiding direct sun exposure and swimming while it heals, wearing loose clothing over the area, and avoiding picking at any peeling skin. Healing timelines vary by individual and by design size, but most people see the surface heal within two to three weeks, with full settling taking longer. Always follow the specific aftercare sheet your artist gives you over generic advice found online, and reach out to your studio or a dermatologist if you notice anything that concerns you.
Quick FAQ
How much does a flower shoulder tattoo cost?
Small, simple fine-line designs often start in the low hundreds, while larger custom pieces with shading or color can run several hundred to over a thousand dollars depending on size, detail, and your artist’s hourly rate.
How painful is a shoulder tattoo?
Pain varies a lot by person, but the shoulder is generally considered a moderate spot — less sensitive than bony areas like the wrist or ribs, though flatter sections toward the blade can feel more intense for some people.
How long does a shoulder tattoo take to heal?
Surface healing typically takes two to three weeks, though this varies by design size and individual skin. Full settling under the skin can take a bit longer.
Will a flower shoulder tattoo fade over time?
All tattoos soften somewhat over the years, especially fine-line and color work. Bold traditional linework and solid blackwork tend to hold their visual clarity the longest.
Final Thoughts
Picking the right flower shoulder tattoo really comes down to matching the technique to how much detail, color, and boldness you actually want long-term — not just what looks good in a single photo. Take the time to talk through placement, size, and technique with a licensed professional artist, since pain tolerance, healing, and how a design ages all vary from person to person. Whatever direction you go, a well-planned flower shoulder tattoo is one of those pieces that keeps looking intentional years down the line, not just on the day you walk out of the chair.