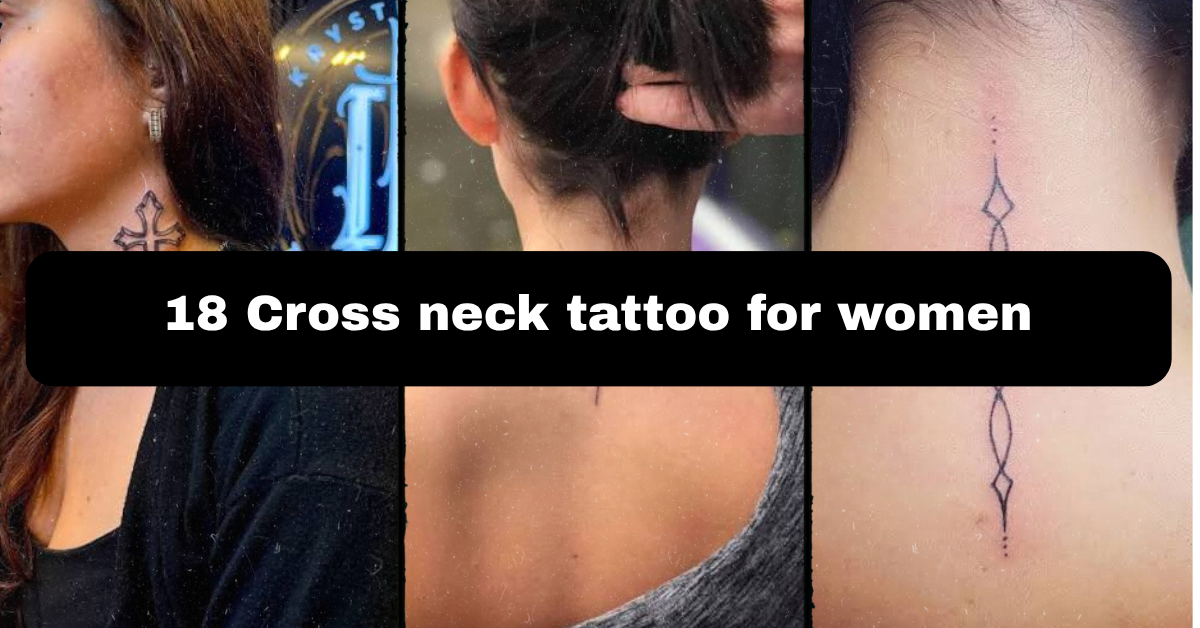
18 Cross Neck Tattoo Ideas for Women: A Complete Style and Placement Guide
Worried you’ll pick a cross neck tattoo design that looks great in a photo but wrong on your actual skin? You’re not alone — the neck is one of the most visible spots on the body, and getting it wrong is a bigger deal than a tattoo tucked under a sleeve.
So what are the best cross neck tattoo ideas for women? Fine-line minimalist crosses, small blackwork crosses behind the ear, and script-paired designs on the side of the neck work best for most first-timers, since they heal cleanly, stay legible at small sizes, and don’t blur with age the way heavily shaded pieces sometimes can.
Stick around, because I’m walking you through 18 specific design directions, honest pain and healing expectations, real placement tradeoffs, and exactly how to brief an artist so you don’t leave the studio with a stencil that isn’t what you asked for.
Why the Neck Works for Cross Tattoos
The neck isn’t just a trendy spot — it’s actually a smart canvas for cross designs specifically. Crosses are simple, symmetrical shapes with strong vertical and horizontal lines, and that geometry reads clearly even in small formats. A cross doesn’t need heavy shading or color saturation to communicate what it is, which means it can go small without turning into a blurry smudge five years later. The neck’s curves also give artists a natural frame to work with — the collarbone dip, the side tendon line, the space behind the ear — so a cross can follow the body instead of just sitting flat on it. That said, the neck is thin-skinned and close to nerve endings, so pain and swelling are more noticeable here than on the arm or thigh. Individual pain tolerance varies quite a bit, so treat any pain comparison below as a general guide, not a guarantee.
Fine-Line Minimalist Cross
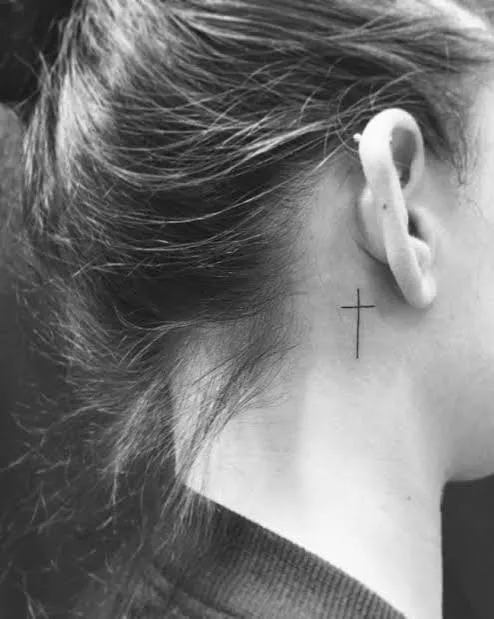
This is the design most first-timers gravitate toward, and for good reason. A fine-line cross uses a single thin needle line — usually a 3RL or similar liner — to create a clean outline with no shading and no fill. There’s no gradient, no dot texture, just a crisp geometric shape. It works beautifully at the base of the neck or just behind the ear because the design doesn’t need room to “breathe” the way a shaded piece does. Keep it between half an inch and an inch and a half for the cleanest healing. Skin with more visible texture or larger pores can cause fine lines to spread slightly over time, so ask your artist about line thickness during consultation, not after the stencil’s already on. Pain here tends to run moderate, since the skin is close to bone and cartilage. It’s an easy pick if your workplace has a visible-tattoo policy, since it can be covered by a collar or scarf without effort.
Bold Blackwork Cross
If fine line feels too delicate for what you want to say, blackwork is the opposite end of the spectrum. This technique uses saturated black ink packed solidly into the design, with thick, confident outlines and zero negative space inside the shape. It reads from across a room, which is exactly the point. A blackwork cross suits the center of the neck or the nape best, where there’s enough flat surface for the artist to work the saturation evenly. Because the ink is dense, touch-ups are less likely down the road compared to fine line, but the initial sitting is more intense — expect more discomfort and possibly a longer single session. Bring a reference photo showing the exact line weight you want, since “bold” means different things to different artists. This one’s less workplace-friendly if visibility is a concern, so think about your day job before booking.
Dotwork Shaded Cross
Dotwork is a technique where the artist builds shading and texture using thousands of tiny individual dots instead of solid fill or continuous lines. Applied to a cross, this creates a soft, almost stippled gradient effect — darker at the center, fading toward the edges. It’s a slower, more meditative-looking design and tends to age gracefully because the dot pattern hides minor fading better than a flat block of color would. This style works well on the side of the neck where there’s a bit more surface area, ideally two to three inches, so the dot gradient has room to actually show its transition. Dotwork sessions take longer than a simple linear cross, so ask your artist upfront how many sitting hours to expect. Pain is comparable to fine line but the repetitive needle contact can make longer sessions feel more tedious than sharp.
Small Side-Neck Cross
Placement matters as much as design here. The side of the neck, just below the ear and along the muscle line, is one of the more forgiving spots for a small cross because it’s easily hidden with hair down and easily shown with hair up — genuine flexibility for work or formal events. A design in this spot should stay under an inch to avoid crowding the narrow space. Simple line work with no shading ages the best here, since the skin along this muscle moves a lot when you turn your head, and heavy shading can distort slightly with that repeated movement over the years. This is a strong first-tattoo location because the pain, while still present, is often reported as more tolerable than the center or back of the neck. It also transitions nicely into a matching tattoo idea if you and a friend or family member want a shared symbol without going somewhere obvious.
Cross with Script Text
Pairing a cross with a word, name, or short phrase in fine-line script adds personal meaning without adding visual bulk. The cross typically sits above or beside the lettering, both rendered in the same thin line weight so they feel like one cohesive piece rather than two competing ideas. This combination works best when kept relatively small and placed along the side or front of the neck, where there’s a clear horizontal run for the script to follow. Font choice matters more than people expect — a heavier serif font will hold up better long-term than a delicate cursive, which can lose legibility as lines soften with age. Ask your artist to draft the lettering separately first so you can approve spacing before it’s stenciled with the cross. Pain-wise, this is similar to any fine-line neck placement — noticeable, but generally manageable in a single sitting.
Cross with Rosary Beads
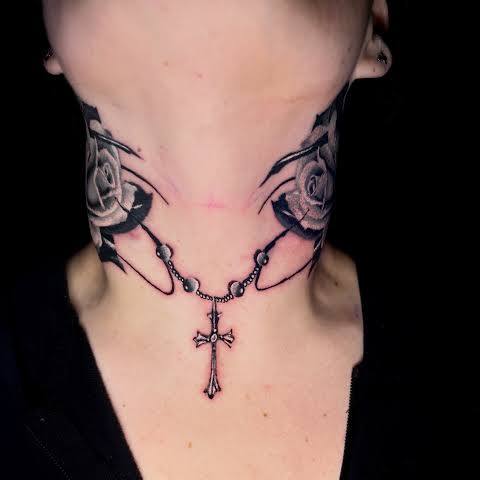
This design wraps a beaded rosary chain around or beneath the cross, often trailing down toward the collarbone or shoulder. It’s more detailed than a standalone cross, usually combining fine outlines for the beads with slightly bolder linework for the cross itself to create visual hierarchy. Because of the added detail, this one needs more real estate — think three to four inches minimum — which usually means the design runs from the side of the neck down toward the collarbone rather than sitting in one contained spot. Skin elasticity in this transition zone can affect how the beads read over time, so ask about placement geometry during your consultation, not after the outline is drawn. This design carries more religious and symbolic weight than a simple cross, so it’s worth thinking through whether you want that message so visible. Expect a longer sitting and correspondingly more overall discomfort than the smaller designs above.
Cross with Floral Wrap
Wrapping small botanical elements — a few leaves, a single blossom, or a thin vine — around the base of a cross softens its geometry and gives it a more decorative, personal feel. The floral elements are usually done in fine line with light shading or minimal color saturation, while the cross itself stays clean and unshaded so it remains the visual anchor. This pairing works well on the nape or the side of the neck, sized around two inches so both the cross and the florals have enough space to stay legible. If you want color, ask specifically about saturation levels during healing — bright color can look more muted once it’s fully healed, so bring reference images and discuss expectations honestly. This is a popular choice for women who want the symbolism of a cross without it reading as purely religious or severe. It also ages well because floral fine line naturally suits a slightly faded, aged look.
Negative Space Cross
Negative space design flips the usual approach — instead of inking the cross shape directly, the artist tattoos the area around it, leaving the cross itself as untouched skin. It’s a clever technique but a demanding one, and it only works well with an experienced artist who understands how to control contrast using surrounding blackwork or dotwork. On the neck, this usually appears within a larger geometric or shaded background piece rather than as a standalone tattoo. Because the “cross” is literally your natural skin tone, its visibility depends heavily on the surrounding ink’s saturation and your own skin tone — deeper skin tones may need denser surrounding ink for the contrast to read clearly. This is not a beginner design; it demands a solid portfolio review before booking. It’s a striking option if you want something that doesn’t look like every other neck tattoo you’ve seen.
Celtic Knot Cross
The Celtic cross swaps a plain cross shape for one incorporating interwoven knotwork, usually within a circular halo around the intersection point. This design relies on continuous, evenly weighted linework — if the lines vary in thickness, the woven illusion falls apart, so this is one place where a skilled hand really shows. Because of the intricate knot pattern, this design needs more space than a simple cross, ideally two to three inches, and works best on the nape or a flatter section of the side neck where the skin doesn’t bunch during head movement. Ask your artist whether they’ve done linework of this density before, since tight interweaving can blur if lines are placed too close together. This design carries cultural and ancestral symbolism for many people, so it’s worth choosing intentionally rather than just aesthetically. It’s a strong option if you want something more visually complex than the minimalist designs above.
Cross with Wings
Adding small wings on either side of the cross creates a symmetrical, almost heraldic look, usually rendered in fine line or light blackwork depending on how bold you want the final piece. The wings are typically kept simple — a few feather lines rather than fully detailed plumage — so the design doesn’t overwhelm the narrow neck canvas. This works well centered at the back of the neck or along the collarbone-adjacent side, sized around two inches wide to give the wings room to spread without crowding. Symmetry is the tricky part here, so bring a clear front-facing reference photo and ask your artist to mock up the stencil on your actual skin before tattooing, since necks vary in width and curve from person to person. This design tends to carry a protective or memorial meaning for a lot of people. It’s a moderate pain placement and a moderate time commitment, sitting between the simplest and most detailed options on this list.
Cross with Butterfly Accent
Pairing a cross with a small butterfly softens the overall look and adds a second layer of personal symbolism — transformation alongside faith or remembrance. The butterfly is usually smaller than the cross and placed just off to one side rather than overlapping it, keeping both elements individually legible. Fine line work suits this combination well, though some women add light color saturation to the butterfly wings while keeping the cross itself pure black line. This pairing works nicely on the side of the neck or just behind the ear at a small scale, generally under two inches combined. If you’re adding color, ask your artist how that particular ink brand has held up in their previous healed work, since color longevity varies more than black ink does. This is a gentle, first-tattoo-friendly option that reads as thoughtful rather than heavy.
Geometric Cross
A geometric cross trades the traditional shape for straight, precise lines arranged in a more abstract or architectural pattern — sometimes with a triangle or diamond intersecting the vertical bar. This style leans on clean fine-line or single-needle work, with sharp angles and intentional negative space rather than any shading. It’s a strong pick for the center or side of the neck at a compact size, since the geometry stays crisp even small. Precision is everything with this design, so review your artist’s portfolio specifically for straight-line consistency — wavering lines are much more noticeable in geometric work than in a looser, organic design. This is a good option if you like the idea of a cross but want it to look modern rather than traditional or religious. It also pairs easily with other small geometric tattoos elsewhere on the body for a cohesive personal collection.
Cross with Heart Detail
Merging a small heart into the center or base of the cross combines two universally understood symbols into one compact design. The heart is usually kept simple — a basic outline or light fill — so it doesn’t compete with the cross for attention. This works well at a small scale, under an inch and a half, making it one of the more discreet options on this list, ideal for behind the ear or the lower side of the neck near the collarbone. Because both shapes are simple, this design tends to age well, holding its form even as fine lines soften slightly over the years. It’s a popular choice for matching tattoos between mothers and daughters or close friends, since the combined symbol can represent different personal meanings to each person wearing it. Pain and healing time are on the lower end for neck placements given the small size.
Single-Needle Cross
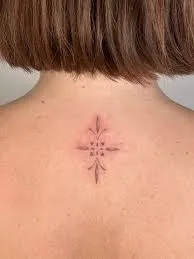
Single-needle refers to the actual tool — literally one needle point, rather than a grouped needle configuration — which produces extremely thin, delicate lines, even finer than typical fine-line work. Applied to a cross, this creates a subtle, almost sketch-like appearance that reads more like a fine pen drawing than a traditional tattoo. It’s best suited to small placements, around an inch or under, since larger single-needle work can appear faint or patchy once healed. This technique requires real precision and a steady hand, so ask specifically whether your prospective artist has single-needle experience — not every studio offers it, and it’s not the same skill set as bold blackwork. Skin with a lot of natural texture may not hold single-needle detail as crisply long-term, so discuss this honestly during your consultation. It’s a great pick if you want something that looks almost accidental in its simplicity.
Cross with Banner or Ribbon
A ribbon or banner draped across or beneath the cross gives you space to add a name, date, or word without needing separate script placement. This design typically uses medium-weight linework for the ribbon’s folds and creases, contrasted against a cleaner outline for the cross itself. It needs a bit more horizontal space than a plain cross, so it suits the side of the neck or a placement extending toward the collarbone, generally two to three inches. Ask your artist to sketch the banner’s folds before finalizing the stencil, since poorly rendered fabric folds can look flat or confusing once tattooed. This is a solid option if you want built-in personalization without going full script-heavy. Expect moderate healing time and a sitting length similar to other mid-detail designs on this list.
Watercolor-Style Cross
Watercolor tattoos use soft color blending and often skip a hard black outline entirely, letting the color itself define the shape with a loose, painterly edge. Applied to a cross, this creates a much softer, almost artistic impression compared to the crisp lines of blackwork or fine line. Color saturation and blending require real skill, so this is a design where portfolio review matters enormously — ask to see healed examples specifically, since watercolor pieces can look very different fresh versus fully settled. It suits the side or back of the neck at a moderate size, roughly two inches, where there’s room for the color gradient to spread naturally. Honestly, colored ink tends to need more touch-ups over time than solid black work, so go into this with realistic expectations about maintenance. It’s a beautiful option if you want your cross to feel more like a small painting than a symbol.
Cross with Stars
Small stars scattered around or trailing from the cross add a celestial, dreamy quality to an otherwise simple symbol. The stars are usually tiny — dotwork or simple fine-line outlines — and positioned asymmetrically to feel more natural than a rigid, evenly spaced pattern. This combination works well on the side of the neck at a small overall size, since the stars need enough negative space around them to avoid looking cluttered. Ask your artist to vary the size of each star slightly during stencil placement, since uniform stars can look stiff compared to a more organic scattered arrangement. This design tends to carry a personal, whimsical meaning rather than a strictly religious one, making it a flexible choice for a range of reasons. It’s a low-to-moderate pain option given its typically small footprint.
Nape-of-Neck Vertical Cross
Placed at the very back of the neck, running vertically down from the hairline, this design takes advantage of one of the few genuinely flat, stable surfaces on the body. A vertical cross here can be rendered in fine line, blackwork, or dotwork depending on your preference, and the placement itself makes the design easy to conceal with hair down. Sizing can range from one to three inches depending on how much of the nape you want to use. This spot tends to be reported as less painful than the front or sides of the neck, since there’s less direct nerve density, though individual experience still varies. It’s an excellent option for anyone who wants visible-when-desired ink that stays hidden the rest of the time — a genuinely practical placement for workplaces with strict visible-tattoo policies.
Best Placement Ideas
Different spots on the neck offer very different tradeoffs. Here’s how they generally compare:
- Nape (back of neck): Easiest to hide with hair down; moderate pain; good for larger, more detailed designs since the skin is flatter and more stable.
- Side of neck: Highly visible when hair is up, hidden when down; moderate-to-higher pain due to thinner skin and muscle movement; best for small-to-medium designs.
- Behind the ear: Very discreet; often reported as more tolerable pain-wise; only suits small, simple designs due to limited space.
- Front/center of neck: Most visible placement; typically the most sensitive area; best reserved for designs you’re fully comfortable showing daily.
- Near the collarbone transition: Good middle ground for detailed pieces needing extra room; easy to conceal with certain necklines.
Tips for Success
Start by looking at an artist’s portfolio specifically for neck placements, not just their general work — healing and stretch behave differently here than on flatter body parts. Book a consultation before committing, and bring multiple reference images so your artist understands the line weight, size, and level of detail you’re actually picturing, not just the general concept. Ask direct questions: what needle configuration will they use, how many sessions will this realistically take, and what’s their touch-up policy if lines fade unevenly. A good artist will walk you through placement geometry on your actual neck, since necks vary in length, width, and curve from person to person. Don’t be afraid to ask about their experience with the specific technique you want, whether that’s dotwork, negative space, or single-needle fine line — not every artist practices every style at the same skill level.
Common Mistakes and How to Avoid Them
- Going too small for detailed designs. Intricate knotwork or dotwork shading needs enough space to actually resolve; shrink it too far and detail turns into a blur.
- Ignoring skin movement at the chosen placement. The side of the neck moves constantly with head turns, which can affect how certain linework settles over time.
- Skipping the portfolio deep-dive. A generic Instagram scroll isn’t the same as reviewing healed work in the specific style you want.
- Copying a design exactly without personalizing it. A cross that means something specific to you — combined with a detail, a font, a placement choice — ages better emotionally than a stock flash design.
- Underestimating aftercare commitment. The neck is harder to keep clean and protected than most other body parts, especially around clothing collars and hair.
Similar Variations
Nearly every design above can be resized, recolored, or combined for a different feel. A fine-line cross can gain a subtle dotwork shadow for more depth. A blackwork cross can be softened with a thin negative-space highlight running through the center. Script pairings can swap from a name to a date, a Bible verse, or a single meaningful word. Floral wraps can shift from small and delicate to a fuller vine that extends toward the shoulder. Even placement itself is a variable — a design sketched for the nape can often be adapted for the side of the neck with size adjustments, though it’s worth discussing that change directly with your artist rather than assuming a one-to-one transfer.
Aftercare Basics
Neck tattoos need the same basic aftercare as anywhere else, just with a bit more attention given the area’s exposure to hair, clothing, and jewelry. Keep the area clean and gently washed as instructed, avoid direct sun exposure while healing, and skip tight collars or scarves that might rub against fresh ink. Avoid swimming pools, saunas, and heavy sweating activities until your artist gives the go-ahead. Every studio provides a specific aftercare sheet tailored to the products they use — always follow that document over generic internet advice, and reach out to your artist or a licensed dermatologist if you notice anything that seems off during healing.
Quick FAQ
How much does a cross neck tattoo cost?
Pricing varies widely by artist experience, location, and design complexity, but small, simple crosses often start in the range of a shop’s minimum charge, while detailed pieces with shading or color cost more. Always ask for a quote during consultation rather than assuming a flat rate.
How painful is a neck tattoo?
Pain tolerance differs from person to person, but the neck is generally considered more sensitive than areas like the outer arm or thigh due to thinner skin and nerve density. Smaller, simpler designs tend to involve shorter sessions and less cumulative discomfort.
How long does healing take?
Surface healing for most neck tattoos generally falls within a few weeks, though full settling underneath can take longer. Following your artist’s specific aftercare instructions matters more than any general timeline you read online.
Will the design fade or blur over time?
Simple, well-executed line work tends to hold its shape longer than heavily detailed or colored designs. Touch-ups are common and normal for keeping any tattoo looking sharp years down the line, and a licensed professional can advise on timing for your specific piece.
Choosing among these 18 cross neck tattoo ideas really comes down to matching the design’s complexity to your comfort with visibility, pain, and upkeep — and being honest with yourself about all three before you sit in the chair. The right choice isn’t the trendiest one you saw online; it’s the one that fits your placement preferences, your pain tolerance, and the meaning you actually want to carry. Take your time finding an artist whose portfolio proves they can execute the specific technique you’re drawn to, ask every question that comes to mind, and you’ll walk away with a cross neck tattoo that still feels right years from now.